Frame Like a Pro: Essential Guide to Make Your Art on Hanji Shine
- 4 okt 2025
- 13 minuten om te lezen
Introduction
You’ve painted on Hanji paper during my Minhwa workshop, and now you’re ready to display your artwork. But how do you frame art on Hanji paper? You came home and realised the paper got a bit wrinkly. How will it look good in a frame? This guide is for you. I’ll walk you through a simple, professional method to make your artwork shine. I simplified the traditional method, so you can frame your artwork without needing special tools or materials. Let’s get your painting ready to hang on the wall!
The Art of Framing Traditional Korean Art
Traditional Korean art framing is a beautiful, but also careful and precise job that turns a painting into a finished work of art. It makes the painting strong and elegant. In old Korea, the three most common traditional methods to frame art were:
Folding Screens: Attaching multiple paintings to a multi-panelled screen that can be folded.
Scrolls: Creating a hanging scroll, often with decorative silk borders.
Frame: When Western culture came to Korea in the early 1900s, Western-style framing began to be used as well.
The first step in traditional framing is 'backing' the painting. This means sticking the artwork to a piece of thicker, white Hanji paper. The backing makes the art stronger and more stable, so it's less likely to tear, crease, or warp.

Nowadays, modern Minhwa art is often attached to a simple wooden panel. The old works, like the ones you can see on a folding screen or a scroll, usually had a decorative border. But modern artists have left this tradition behind, giving their art a simpler, cleaner look. Plus, when art is mounted on a wooden panel, it lasts longer than a scroll.

My Modern Method to frame Minhwa
While the traditional methods are beautiful, they use special materials that aren't always easy to find. Especially, authentic Hanji paper for backing can be hard to find outside of Korea. It also takes a while to learn the skills needed for traditional framing. For example, making traditional wheat starch glue from scratch takes time and practice.
In this guide, I've simplified these steps so you can get a professional look using materials that you can easily find. Instead of making wheat starch glue, we'll use an easy-to-mix wallpaper powder. And by skipping the backing step, we'll save time and effort. Just know that this means your final piece will be a little more fragile, but it will still look beautiful.
I'll show you two different ways to frame your art that keep the spirit of traditional framing while making it easy for everyone to do.
Panel mounting, which is my simplified version of framing a painting on a wooden panel.
Stretch and frame, which is the easiest method, using a picture frame. This method is similar to how you would stretch a watercolour painting.

Method 1: frame your artwork on a panel (simplified traditional way)
Materials
Before we start, let's gather all the things you'll need.

General materials:
Iron (with the steam turned off, or no steam at all)
Mist sprayer with water (It’s important to use a mist sprayer. Do not use a normal plant sprayer, which makes large water particles. You can easily find a good one by searching for a 'continuous mist spray bottle' online.)
Painter's tape
Tools to cut the painting to size: a cutting board and a cutting knife or roller knife. The roller knife is useful when you do the optional step with the fabric border. If you skip that step, the normal knife is good enough.
Newspaper (or paper kitchen towels if you don't have a newspaper)
For the panel:
Wooden panel (These can be found at art shops or online. A tip for buying the panel: double-check the size you need. I used a 25 x 30cm panel, which should fit most paintings from my workshops.)
Thin brown craft/wrapping paper with one smooth side. When the paper is too thick, it will be difficult to neatly fold it around the panel.
Wallpaper glue powder
Container for glue
A flat brush for the glue
A wide bowl that is smaller than the panel (to make the panel float off the table. This makes it easier to handle).
A wide brush with long, strong bristles.
(Old) Fabric scissors (Fabric scissors cut well through wet paper).
Something to protect your table from glue, like a large placemat or vinyl tablecloth.
Optional: cotton, ribbon, or decorative paper (to cover the sides of the panel if the paper is too small. In this tutorial, I used orange fabric to cover the sides, matching the colour of the flower in the painting.)
Steps for framing on a panel
Make the glue
Follow the instructions on your glue packaging; they might be different for other brands. Make sure to stir well while you pour the powder into the water to avoid lumps. Wait for about 10 minutes, and then stir again. If you still see small lumps, you can pour the glue through an old pair of tights to get rid of them. I used a water-to-glue ratio of 100:3 grams.

Step 1: The process of mixing the wallpaper glue. The powder is weighed, poured into water while stirring, and then the mixture is stirred again after it has thickened. ©DaniëlleKim Cut the painting and paper to size
Cut the brown paper to the size of the panel plus twice the panel's thickness and an extra 3 cm. So, for example, if your panel is 25cm x 30cm and has a thickness of 2cm, like mine, the paper should be (25 + 2*2 + 3) x (30 + 2*2 + 3) = 32cm x 37cm.
Cut your painting slightly smaller. You can cut it 1cm smaller than the brown paper. So 31cm x 36cm in my example. Make sure your painting is positioned correctly on the panel before you cut it. For example, a flower stem could end exactly at the edge of the panel.
If your painting is a little too small to cover the sides of the panel, like mine, don't worry. I have added an optional step at the end to make the sides look neat as well.

Step 2: Cut all the materials to size. The photos show the process of cutting the craft paper to fit the panel and trimming the painting to the correct size. The two middle photos demonstrate the optional step of preparing a decorative border by ironing and cutting the orange fabric. ©DaniëlleKim Prepare the panel
Wood is a natural material and can stain your artwork over time. Also, some panels have metal nails or staples, which might give your painting rust stains. Therefore, we first cover the panel with paper to protect your painting.
If your craft paper has one smooth side and one rough side, place it with the rough side facing up (so the glue will be on the rough side, and your painting towards the smooth side). Cover the paper completely with a thin layer of glue using a wide brush.
Place the wooden panel on the wide bowl so it floats above the table.
Place the paper with the glued side onto the panel. Make sure that the panel is in the middle of the paper. Use the wide brush to brush over the surface to make sure there are no air bubbles between the paper and the panel. Then, use the brush to fold the paper over the sides. Fold the corners so they come together. Then cut the corners off so that the paper fits neatly around the edge of the panel.
Fold the paper over the edge again with the wide brush, so it ends at the back of the panel. Make sure all edges are glued well

Step 3: To cover the panel, first apply glue to the craft paper. Then, fold the paper tightly around the panel and use a dry brush to smooth it out. Pay special attention to the corners and ensure no air bubbles are trapped under the paper. ©DaniëlleKim Attach the painting
First, iron your painting on medium heat; place the painting front down. You can put parchment paper on top for protection. Also, make sure the iron does not steam. By doing this, the pigments will adhere better to the paper, and there will be less chance of bleeding when wetting the paper in the next step. So this step is not to make your painting 100% flat, that will happen in the next step.
Place your painting on the newspaper with the front facing down. The newspaper helps to prevent bleeding, so don't skip it. If you don't have newspaper, you could also use paper kitchen towels. Use the mist sprayer to lightly wet the back of your painting. Make sure you don't spray directly onto your painting. Instead, spray almost horizontally, so the water slowly falls onto the paper. By wetting the paper, it will expand a little. And when the paper dries, it will shrink again and be very smooth on your panel.
Brush glue onto the sides of your panel. We only glue the sides, so you can always take your painting off later if you want to frame it differently.
Place the (wet) painting over the frame and position it in the middle. Then, carefully brush the sides of the painting over the edge of the panel with the wide dry brush. Do not brush over the painting like you did for the brown paper—this might smear the paint. Fold the corners into a triangle, add a little glue to one side of the corner and fold it over. We often fold them to the top and bottom because these sides will be less visible. When folding the corners, be sure to keep the paper tight to the panel and prevent air from going underneath the paper. Fold and glue the remaining edges to the back of the panel.

Step 4: Attaching the painting to the panel. First, apply glue to the sides of the panel. Then, slightly wet the back of the painting on Hanji paper and attach it to the panel. ©DaniëlleKim Optional: decorative sides of the panel
If your painting doesn’t reach the back of the panel like mine, don't worry—just follow this step. You can also do this if you just want to add a decorative edge. In my example, I use a simple cotton fabric in a single colour. But you can also use a decorative fabric like silk or a nice paper.
The circumference of my panel is 2*25 + 2*30 = 110cm, and my panel is 2cm deep. So I cut a piece of fabric that is 2cm wide and a little longer than 110cm. The easiest way to cut a long, narrow piece of fabric straight is by using a roller knife, which can be found in craft shops or online.
Then, cover the sides of the panel with glue again, being very careful not to spill any glue on the front of your painting. I find it easiest to do this using my fingers because I can very precisely feel where the glue is going.
Now, place the fabric around the edge. When you've gone all the way around, cut it so the ends match exactly (with a tiny 0.5mm overlap to account for shrinking).
Cover the sides again with glue to stop the fabric from fraying. This isn't needed if you use paper. Start at the bottom of the painting, about 2 cm away from the corner. This way, the beginning and end of the strip are less noticeable. To attach the fabric or paper strip, use the ball of your thumb to press it down so it lines up perfectly with the edge of the panel.
I added a second layer of glue over the fabric to prevent raffling of the edges. When using paper on the sides, this step is not needed.
Let your panel dry overnight while it's floating over the bowl.

Method 2: stretch and frame (easiest way) your art on Hanji
For this simple method, the list of materials is short. You can focus on selecting the right frame for your artwork.

General materials:
Iron (with the steam turned off)
Mist sprayer with water (It’s important to use a mist sprayer, not a normal plant spray, which makes large water particles. You can find a good one by searching for a 'continuous mist spray bottle' online.)
Painter's tape
Tools to cut the painting to size: a cutting board and a cutting knife or roller knife.
Newspaper (or paper kitchen towels if you don't have a newspaper)
For the frame:
Prepare a smooth surface that can withstand moisture, like a coated wooden panel or a clean window
Picture frame (with a passe-partout. Read tips for picking the best frame below.)
Optional: thick white paper that fits inside the frame (to place behind your painting for an even background)
When buying a frame, there are a couple of points to consider:
With or without a passe-partout: A passe-partout is a paper or cardboard inlay that goes between the glass and your artwork. It has a cutout in the middle of the size of your painting. Sometimes these come with the frame, but if not, you can order a custom-sized one. It’s also possible to leave out the passe-partout. Using a passe-partout gives your artwork a clean, professional look and prevents it from touching the glass, which can protect it from moisture or sticking over time. Leaving it out gives a more modern, minimalist feel and is a good choice for larger, simple pieces that can stand on their own.
Size of the frame: If you aren't using a passe-partout, it’s very important to get the correct size. Your artwork should fit in the frame, but the space around the painting should look right.
Glass or plexiglass glazing: These are the most common options. A plexiglass glazing is lightweight and won't break easily, but it can scratch more easily than glass and may create a glare. On the other hand, glass glazing is heavier and can shatter, but it’s more scratch-resistant and gives a clearer, more premium look.
Colour and shape of the moulding (the wooden sides of a picture frame): The frame should match your painting and your home. For a timeless look, choose a simple frame that doesn't steal the show. In general, natural wood tones look great with Minhwa paintings. A simple frame gives a modern feel, while a decorative one adds a traditional touch.
Steps
Stretch the painting
Similar to the first method, first iron your painting. Place the painting face down, and make sure the iron doesn't steam. You can put parchment paper on top for protection.
Place your painting on the newspaper with the front side down. The newspaper helps to prevent bleeding, so don't skip this. If you don't have newspaper, you could also use paper kitchen towels. Use the mist sprayer to lightly wet the back of your painting. Make sure you don't spray directly onto your painting. Instead, spray almost horizontally, so the water slowly falls onto the paper.
Move the painting to a firm surface—I’m using a wooden panel, but a clean window also works. Tape all the sides of the paper to the surface and let it dry overnight.
The next day, your artwork will be very flat and smooth, without wrinkles. When it's completely dry, you can carefully take off the tape.
Frame your art
Now you can open your frame and place the painting inside. If you use a passe-partout, you can use two little pieces of painter's tape to stick your painting to the top. This makes sure the painting won't slide down when you hang it.

Finding the best spot for your new artwork
You finished framing your artwork, so now it is time to find the perfect place to display it! Choose a spot where you can enjoy it often, but be mindful of its location. Direct sunlight is a no-go, as it will fade the colours and harm the paper. You should also keep it away from radiators and humid areas, like right next to a bathroom door. Sudden changes in temperature and moisture can cause the paper to warp.
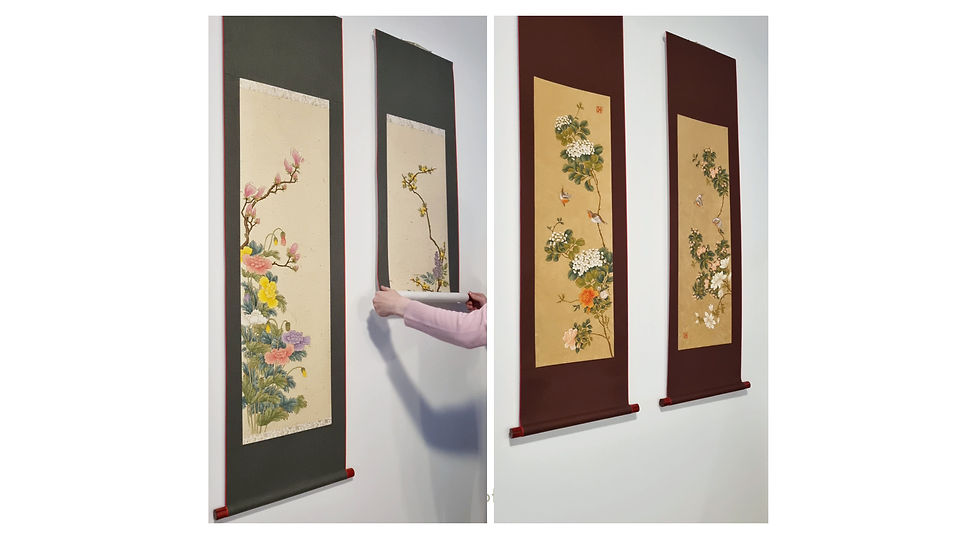
You can take inspiration from the Joseon dynasty, where paintings were often placed in the traditional guest room, called the sarangbang. These artworks were a way for scholars to show their personality and refined tastes. They would even rotate the paintings with the seasons! I love this idea and also do it myself. I have made two sets of paintings on scrolls that I change out. One has green fabric with soft, pastel tones for spring and summer, while the other has brown fabric and a painting with rich greens and red birds to add some warmth in the colder months.
Final Thoughts
I hope this guide helps you enjoy your painting on Hanji even more. If you followed this tutorial, I would love to hear and see what you made! You can share a comment here, tag me on Instagram, or send me an email.
If you'd like to learn painting Minhwa on Hanji paper, I offer workshops in the Netherlands where you can create your own masterpiece. You can also follow me on Instagram to see more of my and my students' work and get inspired. Or subscribe to the newsletter to receive updates about new blog posts and workshops.
Ps. I am still working on a Dutch translation of this tutorial. Also, I am planning to edit a video to explain the process more clearly. I expect that it will take some time to make these, so I am already uploading this blog post. Stay tuned for the Dutch translated version and for the video tutorials.
Opmerkingen